Fluke 88 V/A Automotive Multimeter Review -Best Multimeter for Cars Audio
Fluke 88V, an automotive multimeter in the series five or fifth-generation Fluke. They have made some changes to the three series. For example, the dial selector, the buttons, the bottom are the same. We can check RPMs, volts, ohms, temperature, and the diode test. We use the red lead for the red Jack, i.e. live, and the black lead for the common or the ground.
The Fluke 88V meter has the measurement functions, the troubleshooting features, and the accuracy levels, which professionals need to solve the problems on conventional and hybrid vehicles. As a result, the Fluke 88V is the most influential automotive multimeter device offered by Fluke.
In addition to the standard multimeter features such as; the ability to measure voltage, current, continuity, and resistance, the 88V can also perform the Pulse width, Duty cycle, Min/Max/Average recordings, and the Diode tests. The pulse width function can observe millisecond resolution for the troubleshooting of fuel injectors.
● CAT IV rated
● Large backlight display with analog bar
● Measures 1000 volts A/C, D/C
● Measures 20amps Current
● Frequency and capacitance
● Auto and manual ranging
● Input jack alert
● Pulse-width measurements in milliseconds
● Min/max and Peak recordings
● Relative mode
● Auto-hold
● 10M Ohms input impedance
● Limited lifetime warranty
● Duty Cycle selection
● Auto Power Function
- D/C Maximum voltage 1000 V
- A/C Maximum voltage1000 V
- A/C bandwidth 5 kHz
- D/C current Maximum amps 10A
- Resistance Maximum resistance 50MΩ
- Temperature operating(-20°C – 55°C)
- Temperature storage(-40°C – 60°C)
- Size 5.2 x 9.8x 20.1 cm (2.06 x 3.86 x 7.93 in)
- Weight 624 g (22 oz.)
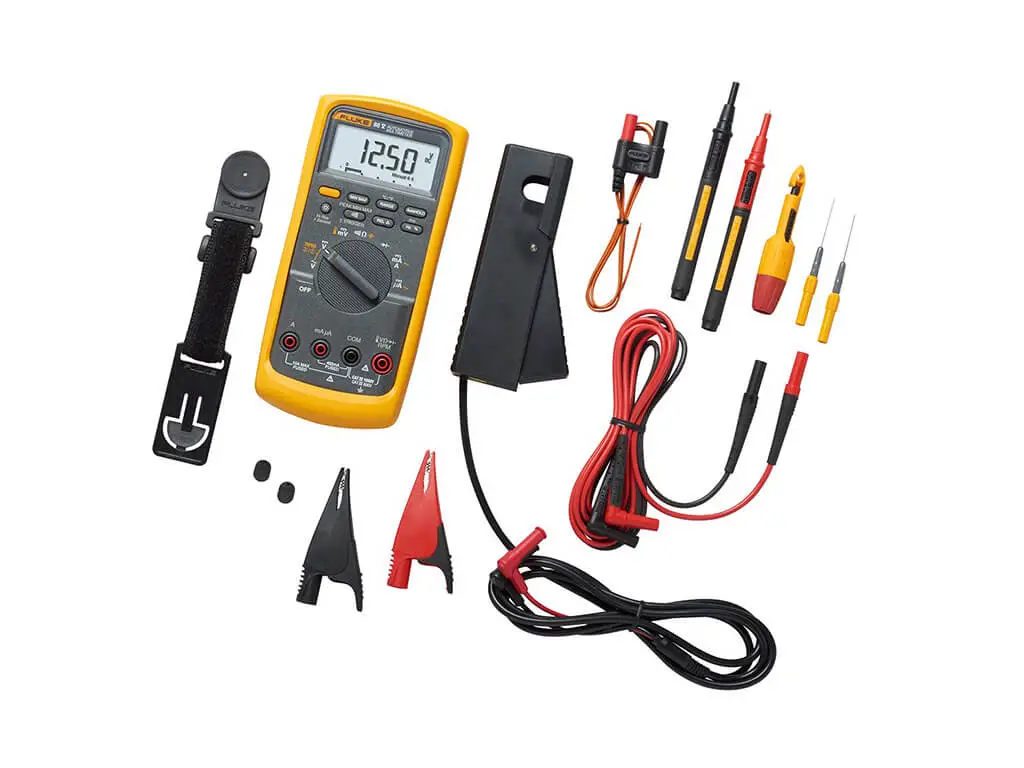
- Model 88V multimeter
- SureGrip silicone test leads.
- SureGrip large jaw.
- Alligator clip set and Test probes
- Inductive RPM pick-up probe.
- ToolPak magnetic meter hanging kit: universal hanger; magnet; 17″ (23 cm) hanging strap
- Temperature probe.
- Automotive backprobe pins
- Insulation piercing probe
- Durable carrying case and Holster
- 9V battery (installed) and Instructional CD
- Reliable inaccuracy.
- RPM and pulse width measurements
- Full of functions good automotive functionality
- Improve display in the fifth generation
- CATIV rated
- Large size
- Expensive
Table of Contents
Frequently Asked Questions
Both the multimeters can measure up to 1000V and 20A A/C & D/C. Both the meters support temperature, measurement, and diode test. The meters are different in basic D/C accuracy; the 87-V is accurate to 0.05% while the 88-V is accurate to 0.1%. Another difference between the two concerns their special features.
Hold on the Min/Max button on the meter, press the Auto/Hold button once, and then wait for the display to show C-01. When the display is ready to show this, attach the meter’s outputs into the calibration tool’s inputs.
Read more: How to use an Automotive Multimeter
How to Operate the Fluke 88V multimeter
CAT III 600 volts
We call in the automotive world and, of course, the 400 milliamps on the tenon, 10 amp fuse, and meter functions. It is not only a CATIII 3,000-voltmeter like the fluke 87 three Series. It is also rated CAT for 600 volts. Now, what do those ratings mean? These are the type of environment you can be working in and the high-voltage world. Safely with category III would be a little bit closer to the source of the power itself. You’ve got to make sure if you’re working on a hybrid vehicle that you have a CAT III 1000 voltmeter to be safe.
A/C Voltage and RPMs selection
We’ll talk about what has changed with some of the 5 Series functions: the rotary knob. If we go to A/C voltage, you also see it has double duty in the yellow RPMs 1 and 2. The 1, and 2 RPMs would be a single ignition event per two revolutions or 2 ignition events in 2 revolutions, such as a two-cycle engine or more running into a DIS system. We fire a coil, every cylinder rotation, every crank rotation, instead of every other crank rotation to get it into the RPMs mode.
You’ll be using the inductive clamp that goes around the plug wire. The secondary ignition wire in these two jacks right here goes, and then you will hit the yellow button. So unlike the 3-series, it had the blue button to get the multifunction and functionality of the rotary switch it’s got a yellow button.
D/C voltage selection
So when you’re in RPM 1 or 2. Whether you’re A/C volts or D/C volts, if you want to toggle between RPM 1 and 2, making this effectively, you simply hit the button for yellow, and you see it says RPM 1 RPM 2, back and forth and back and back to either D/C volts or A/C volts. Whichever you’ve got it on, so the yellow button gives you the faceplate of the tester, the multi-functions RPM 1 + 2 DIS or non-DIS is the same thing we turn this up to millivolt D/C.
Temperature mode selection
We can also toggle into temperature. When we go to temperature defaults to Fahrenheit, if you want to see Celsius a little multifunction button up here above the word range, we go to Celsius, so back toggling back and forth Celsius, Fahrenheit.
To go back to millivolts by hitting the function shift button, the yellow button, and then we’re back to millivolts D/C.
Capacitance/ Continuity selection
The same thing is true for continuity test/ohms with an Omega symbol. In yellow the capacitance, we’re testing a capacitance of a circuit. Hit the yellow button and
now it says nano farad NF.
A/C and D/C modes/ microamps /milliamps
Then we turn it to milliamps or microamps, whichever you want to do. If you leave it without pressing any buttons, it’s in D/C mode; it’s the D/C symbol in white.
But if you hit the function shift button, the yellow button gets you the yellow symbol, which is the sinusoidal symbol or sign wave meaning A/C. Now we measure A/C amperage milliamps or A/C microamps. To get it back to D/C microamps, hit that function button again to change A/C to D/C. That’s how we toggle back and forth. That’s the rotary switch on the fluke 88 V series.
Backlight Button
Let’s take a look at the buttons now once again, we’ve got the backlight button which backlights on at the moment we could turn it off, but it also has two settings. We have a low and a high setting.
Resolution check
Now underneath the backlight button, there is the word high Res one second. Now what that means is you can get higher resolution metering out of the meter. Holding the button down one second and holding it down one second does it again one second and release, and it says high Res in the bottom of the right-hand corner of the screen.
Continuity selection
Now let’s go ahead and turn it to ohms or capacitance to check if we’re using the function button or, in this case, the little continuity symbol. If I want to turn off the beep, I don’t want to bother anybody with that high-pitched frequency noise. I can turn the beep off and on manually with this button, the symbol of the beep.
Recording mode selection
If I’ve got on the rotary switch will say on D/C volts. And I’m doing a min/max will say; I’m looking for some loose connection, and if I have a voltage drop as I wiggle a wire, I want to catch the minimum to record. Let’s go ahead and put it in recording mode, record two min-max, and hit this button that says trigger underneath. It’s now becoming a second function of the button.
Besides the continuity beeper symbol. I hit the button that says trigger, and now I’ve just sent the meter into a higher resolution mode at 250., You can see that sounds the word peak right here in the upper left-hand corner at 250 microseconds of captured. So we’re capturing data quicker, so if you want more resolution for your min-max sample rate. Turn it to volts ohms whatever you’re doing a min-max amp even for that matter if you’re checking the minimum, the maximum of the most or least amount.
Peak Check selection
Turn it off and back on again, get it back to where it was now; we’ll go ahead and hit the min-max we’re recording, and push that button it has a second function. When you’re in the min-max mode, it’s called the trigger, and we will have quicker updates from 250 microseconds peak to the normal 100 milliseconds of update of min-max recording.
Relative Delta Button
Move the dial to relative Delta, their relative button or a little delta triangle symbol right h we can press that, and that will show us a change so if the voltages went from 12.5V to 14.5V into this relative Delta if you wouldn’t see 12.5 or 14.5 you’d see the two volts it increased.
Ohms Button
If you turn your dial to ohms and hook your red and black leads together and zero the meter, this button has that function to zero the meter to make a show from, say, 0.1 or 0.2 ohms. The resistance of the leads hook together to zero points zero, then when you connect the leads into the circuit on the car. Now you see truly exactly what the resistance is of that circuit. You’re measuring and moving over to the right Hertz or percentage that would be our duty cycle percentage
Duty Cycle selection
Turn the dial to the voltage, and we hit it once, and you’ll see it says Hz times per second Hertz., We hit it again now it’s win percentage in the duty cycle, but pulse width modulated circuit and then starting back up at the top again top left corner, the yellow button our function so if you see anything in yellow on the rotary dial, we are going from what is in the white–what’s in the yellow is RPMs and we hit the yellow button;( temperature, capacitance check, A/C amps, micro amps and milliamps)
Auto and Manual Range Selection
If you hit the (yellow button and the average), you will see it says min-max range if we went into min-max.
Turn the meter on in three series; I’ll get a backlight here; it’s going to be an Auto-ranging by default now in the 5-series; it appears that they have a different default. They’re in a manual range in a matter of fact, it says right here manual.
Now, if we want to change from manual to the auto range, we have to hold a button down as we turn the meter on now that button is the little backlight button, so let’s turn the meter off and watch what happens when I hold the backlight button down and turn it to D/C volts again the word Auto comes up. As I rotate it to D/C volts, the auto pops up. When I release it look at the scaling instead of saying manual down here at the bottom, it says Auto it’s an auto-ranging scale.
Auto Power Function
Push it down and hold it down, and then turn the meter on will see the display comes up and say P off; what that means? is power off? doesn’t mean it’s going to power it off; it means it’s not going to go into the auto power off or auto-shutdown. So when I release this now, if I walk away from the car for 30minutes and I come back, the meter hasn’t automatically shut down to prevent
The battery rundown is going to stay powered up to the Auto power-down function. Which has been removed temporarily when you hold that button down and turn it on other functions of holding the button down and turning the meter on. If I wanted to calibrate the meter, which requires special procedures and equipment.
I think these are the functions in detail to learn to operate a Fluke 88V multimeter.
Read more: Top 10 Best Automotive Multimeters
Conclusion
The Fluke 88V multimeter is worth buying. We have discussed whether all functions are more updated. According to the users, the LIFETIME WARRANTY put this meter above all the competitor’s lists. All the functions can work Auto-range or Manual-range. I have mentioned how to switch that. The article very well explains the use of this multimeter which is an extra advantage for beginners to learn.
For Automotive or general-purpose electrical use, the Fluke 88-V has beaten the market. Perhaps it does not compete with the accuracy of the Fluke 87V, because it is without True RMS. Therefore the 87-V would be a better pick for electronics work. But with the RPM test and D/C defaults are ideal for the automotive workshop, and its rugged and robust build helps in rough uses and protects it from fall.
Related posts:
Fluke 116 Digital Multimeter Reviews
Fluke 117/323 KIT Multimeter and Clamp Meter Combo Kit Review


")